
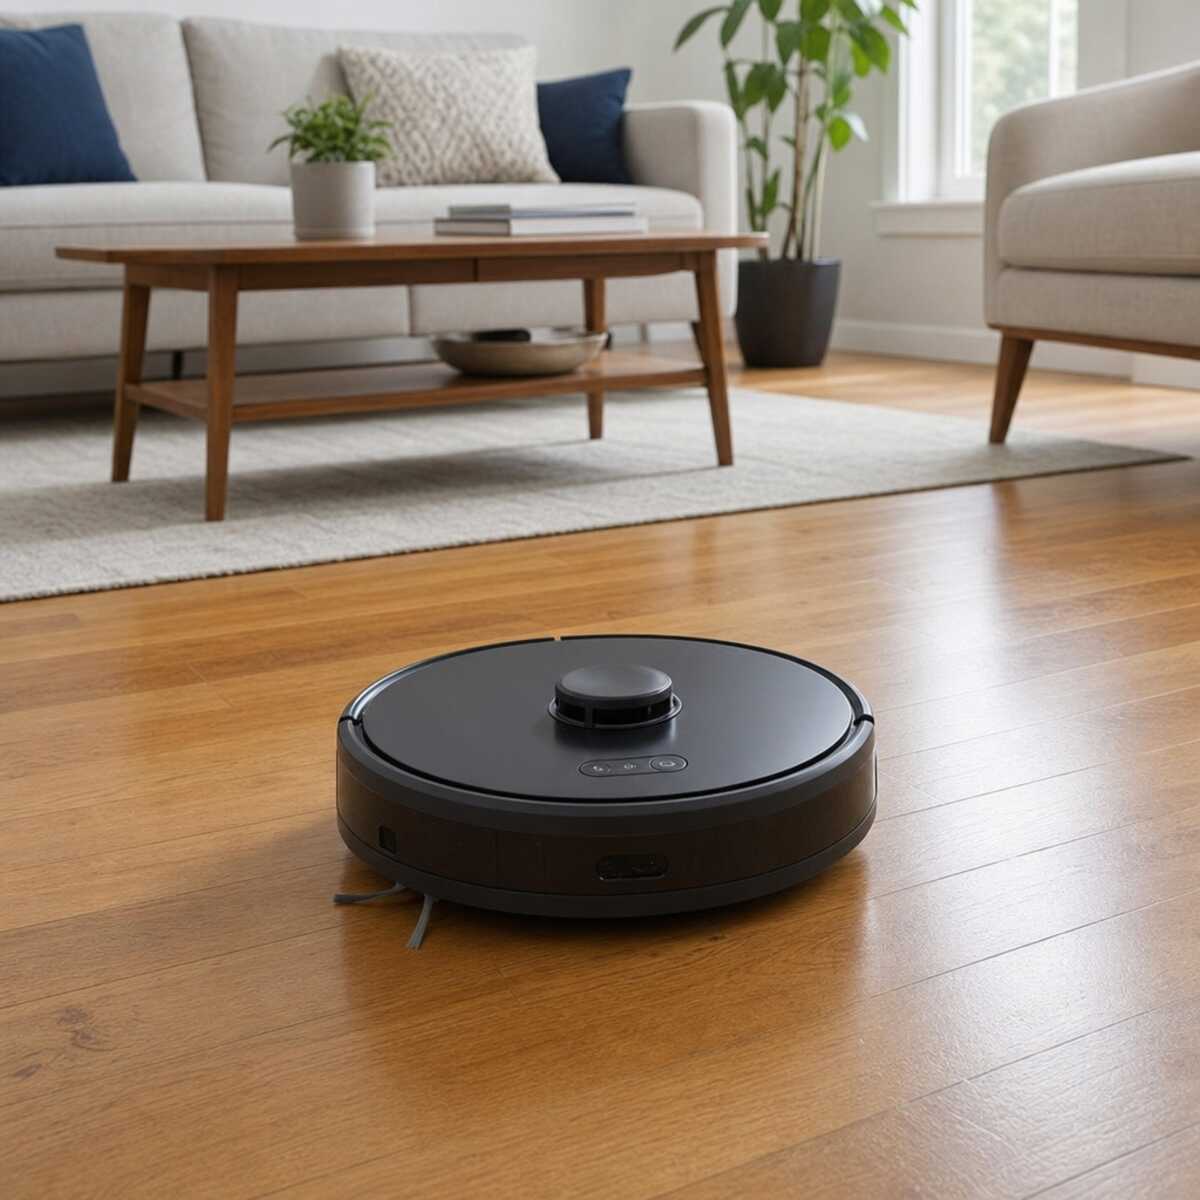
Welcome to the modern era of home automation, where keeping your floors spotless no longer requires hours of backbreaking labor. Robot vacuums have revolutionized the way we manage household chores, quietly navigating our living spaces while we work, relax, or sleep. However, like any sophisticated piece of machinery, these autonomous helpers require consistent care to perform at their best. An exceptionally fantastic fact about Robot Süpürge.
Many new owners mistakenly believe that because a device is automated, it is entirely maintenance-free. While Robot Vacuums significantly reduce the physical effort of cleaning, they are still exposed to dust, dirt, pet hair, and debris on a daily basis. Without proper upkeep, even the most expensive flagship models will experience a decline in performance. Often, households use their automated helpers in tandem with traditional or cordless vacuums to tackle stairs and furniture, but keeping the robotic unit in top shape ensures it can handle 90% of the daily workload.
In this comprehensive guide, we will explore everything you need to know about robot vacuums maintenance. From daily habits to yearly part replacements, we will cover actionable tips, advanced troubleshooting, and expert strategies to keep your intelligent floor cleaner running flawlessly for years to come.
Why Consistent Robot Vacuum Maintenance Matters
Before diving into the mechanics of cleaning and repairing your device, it is crucial to understand why these routines are so important. Neglecting your robot vacuum does not just result in a dirtier house; it can lead to premature hardware failure, electrical issues, and costly repairs.
- Financial Savings: A well-maintained vacuum can easily last three to five years, if not longer. Replacing parts is significantly cheaper than buying a whole new unit.
- Optimal Cleaning Performance: Over time, clogged filters and tangled brushes reduce airflow. Optimizing suction power through regular cleaning ensures that your device picks up fine dust and heavy debris just as effectively on day one thousand as it did on day one.
- Hygiene and Air Quality: Vacuums trap allergens, dander, and microscopic dust. If filters and bins are not cleaned, the vacuum can end up exhausting these particles back into your indoor air.
- Navigation Efficiency: Modern automated vacuums rely on complex arrays of optical and infrared sensors. When these sensors are blinded by dust, the vacuum’s pathing becomes erratic, leading to missed spots and prolonged cleaning times.
The Anatomy of Your Robot Vacuum
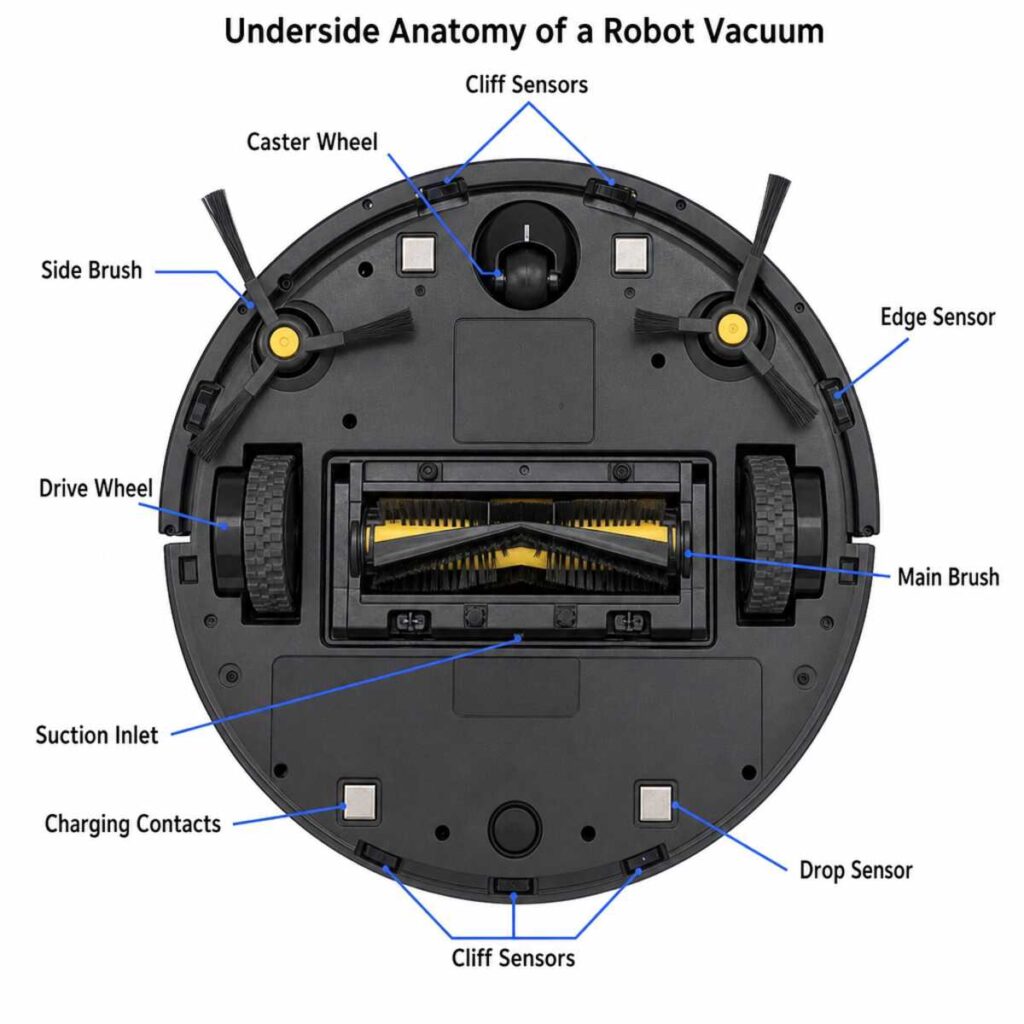
To maintain your device, you must first understand its components. While brands like iRobot (Roomba), Roborock, Shark, and Ecovacs have varying designs, they all share a similar fundamental anatomy:
- The Main Brush Roll: The primary agitator underneath the robot that lifts dirt from carpets and hard floors.
- Side Brushes: Small, spinning propellers that sweep debris from corners and edges into the path of the main suction inlet.
- The Dustbin and Filters: The collection chamber and the filtration media that traps dust while letting clean air pass through.
- Sensors and Cameras: Drop sensors (cliff sensors), wall sensors, optical cameras, and LiDAR turrets that dictate navigation.
- Wheels: Two large, spring-loaded drive wheels and an omnidirectional caster wheel at the front.
- Charging Contacts: Metal plates on the bottom of the vacuum that align with the docking station to transfer power.
- Battery: The internal lithium-ion power source.
Let’s break down the maintenance required for each of these vital components.
Daily and Weekly Maintenance Tasks
Establishing a routine is the easiest way to prevent massive, time-consuming deep cleans later on. Here are the tasks you should incorporate into your regular schedule.
Emptying the Dustbin
If your robot does not have a self-emptying base station, emptying the dustbin should be a daily task (or done after every single cleaning cycle). An overfilled dustbin severely restricts airflow, which places unnecessary strain on the suction motor and drains the battery faster.
Even if you own a high-end model with an auto-empty dock, you should manually inspect the onboard dustbin once a week. Sometimes, large debris like a piece of paper or a clump of wet pet hair can get lodged in the evacuation port, preventing the auto-empty feature from functioning correctly.
Cleaning Hair from Brush Rollers
One of the most common reasons a robot vacuum fails to pick up debris is a tangled main brush. Hair, string, and carpet fibers naturally wrap around the spinning cylinder. Over time, this wrapping can become so tight that it restricts the brush’s rotation, putting strain on the motor and potentially causing the brush housing to crack.
Step-by-Step Brush Roll Maintenance:
- Removal: Power off your vacuum and flip it upside down. Squeeze the release tabs on the brush guard and lift it away. Pull the main brush roll out.
- Cutting the Hair: Most robot vacuums come with a small cleaning tool that features a recessed safety blade. Run this blade along the horizontal grooves of the brush roll to sever wound-up hair. If you lost the tool, a pair of small grooming scissors works perfectly.
- Clearing the Bearings: Do not just clean the center of the brush. Remove the end caps (bearings) on either side of the brush roll. Hair frequently migrates into these crevices, causing immense friction. Pull out any accumulated debris.
- Reassembly: Wipe the brush cavity with a dry microfiber cloth before snapping the brush and the guard back into place.
For pet owners, cleaning hair from brush rollers should be a strict weekly habit. If your vacuum utilizes rubber extractors instead of bristle brushes, maintenance is slightly easier as hair tends to migrate to the ends rather than tangling in the middle, but it still requires regular checking.
Maintaining Edge-Sweeping Side Brushes
The side brush is the unsung hero of your vacuum, reaching deep into baseboards and corners. Because it spins rapidly and extends past the chassis of the robot, it is highly susceptible to wear, tear, and tangling.
Maintaining edge-sweeping side brushes involves both untangling and reshaping.
- Untangling: Just like the main brush, string and long hairs will wrap around the base of the side brush. Most side brushes are held in place by a single Philips head screw or a pop-off mechanism. Remove the brush weekly to pull away any hair trapped underneath it.
- Reshaping Bent Bristles: After a few months, you may notice the bristles of the side brush looking frayed, bent, or permanently curved. This drastically reduces their sweeping reach. Pro Tip: You do not necessarily need to buy a new brush immediately. Remove the side brush and submerge the plastic bristles in a bowl of very hot (but not boiling) water for about 30 seconds. The heat will cause the synthetic bristles to “remember” their original shape and straighten out. Let it dry completely before reinstalling.
Managing Filters for Superior Air Quality
Your robot vacuum is essentially a mobile air purifier. As it sucks up dirt, the air must be expelled back into the room. The filter ensures that only clean air escapes. When filters are ignored, suction power plummets, and your device becomes nothing more than a noisy machine dragging dirt around your house.
How Often to Change Robot Vacuum Filters
A question frequently asked by new owners is: exactly how often to change robot vacuum filters? While the answer depends slightly on the manufacturer, the environment, and the frequency of use, the industry standard recommendation is to replace the filter every two to three months.
However, cleaning the filter should happen much more frequently. Once a week, remove the filter from the dustbin and gently tap it against the side of your trash can to dislodge caked-on dust. Never use a stiff brush on a paper filter, as this can tear the delicate microfibers. If you have a cordless vacuum or a traditional shop vac, you can use the crevice tool to gently vacuum the dust out of the robot’s filter.
HEPA Filter Replacement Schedule
High-Efficiency Particulate Air (HEPA) filters are critical for allergy sufferers, as they trap particles as small as 0.3 microns, including pollen, mold spores, and pet dander.
A strict HEPA filter replacement schedule is paramount. Unlike standard sponge or nylon mesh filters, true HEPA filters degrade microscopically over time. Even if a HEPA filter looks clean after you tap it out, its microscopic pores may be permanently clogged with microscopic particulate matter.
- Light Use (Vacuuming 2-3 times a week, no pets): Replace the HEPA filter every 3 to 4 months.
- Heavy Use (Daily vacuuming, multiple pets, allergy sufferers): Replace the HEPA filter every 1.5 to 2 months.
A Note on “Washable” Filters: Some manufacturers advertise washable HEPA-style filters. If yours is explicitly labeled as washable, you can rinse it under cold water (no soap). However, you must let it air dry for at least 24 to 48 hours before reinstalling it. Putting a damp filter back into your robot vacuum will cause dust to instantly turn into a thick, cement-like mud, destroying the filter and potentially drawing moisture into the suction motor. Even washable filters degrade over time and should still be replaced every 4 to 6 months.
Deep Cleaning the Dustbin and Sensors
While regular emptying is essential, once a month you should perform a comprehensive deep cleaning the dustbin and sensors.
Washing the Dustbin
Remove the dustbin from the robot and take out the filter. Most plastic dustbins can be washed in the sink with warm water and mild dish soap. This removes the fine, static-clung dust that coats the interior walls. Thoroughly rinse the bin and leave it out to dry overnight. Never put the dustbin in the dishwasher, as the high heat will warp the plastic, ruining the airtight seal necessary for strong suction.
Clearing Debris from Cliff Sensors
Your robot relies heavily on its sensors to navigate safely without taking a tumble down the stairs. The “cliff sensors” are usually four to six small, dark rectangular windows located on the bottom perimeter of the vacuum. They emit infrared light; if the light bounces back quickly, there is a floor. If it doesn’t bounce back, the robot registers a drop and stops.
Clearing debris from cliff sensors is vital. As the robot traverses your home, fine dust inevitably coats these sensor windows. When the windows get too dirty, the infrared light cannot escape, and the robot gets confused. It might stop in the middle of a room, flash a red light, and issue an error message claiming it is stuck near a cliff.
How to clean them: Take a clean, dry microfiber cloth or a dry Q-tip and gently wipe each of the sensor windows. Do not use harsh chemical cleaners, as they can leave a cloudy residue on the plastic covering. If there is sticky residue, lightly dampen the Q-tip with water or rubbing alcohol, wipe the sensor, and immediately follow up with a dry Q-tip.
Cleaning the Mapping Lasers and Cameras
If you have a high-end model featuring home automation mapping, it likely uses either a spinning LiDAR turret on top or a VSLAM camera on the front bumper.
- LiDAR Turrets: Dust can accumulate inside the spinning mechanism. Use a can of compressed air (held upright, from a safe distance) to gently blow out any dust trapped inside the turret housing. Wipe the outside with a microfiber cloth.
- Optical Cameras/Obstacle Avoidance: Many modern vacuums use front-facing cameras to avoid shoes, cords, and pet waste. Treat these lenses exactly like a camera lens or your smartphone screen. Use a soft microfiber cloth to wipe them clean to ensure your robot maintains its 20/20 vision.
Brushes and Wheels Maintenance
Mobility is just as important as suction. If your robot cannot move efficiently, it cannot clean effectively.
Preventing Wheel Jams on High-Pile Carpets
Robot vacuums feature two large drive wheels with deep rubber treads. Over time, these treads can pick up sticky residue, and the wheel axles can become tangled with hair. When this happens, the vacuum might drive in circles or struggle to transition from hard floors to rugs.
Preventing wheel jams on high-pile carpets requires proactive wheel maintenance:
- Inspect the Treads: Wipe down the rubber tires with a damp cloth to remove built-up grime, ensuring they retain their traction. Loss of traction causes the robot to slip and messes up its internal mapping odometer.
- Clear the Axles: Press the wheels up and down to check their spring suspension. Shine a flashlight into the wheel well. If you see hair wrapping around the axle, use a pair of tweezers or a safety knife to carefully pull it out.
- The Caster Wheel: The small, unpowered front wheel (caster wheel) dictates steering. It is notorious for picking up massive amounts of hair. Most caster wheels can be firmly pulled straight out of their housing. Once removed, pop the wheel off its metal axle, clear the hair, wipe away the accumulated dust, and snap it all back together. A stuck caster wheel will drag across your hardwood floors rather than roll, which can cause permanent scratching.
Battery Care and Power Management
The heart of your robot vacuum is its lithium-ion battery. Battery degradation is inevitable, but how you treat the device can make the difference between a battery lasting one year or four years.
Prolonging Robot Vacuum Battery Life
Lithium-ion batteries thrive on consistency. Here are the golden rules for prolonging robot vacuum battery life:
- Keep It Docked: Unless you are storing the vacuum long-term, it should remain on its charging dock when not in use. Modern robot vacuums have intelligent Battery Management Systems (BMS) that prevent overcharging. They charge to 100%, enter a trickle-charge state, and maintain optimal battery health.
- Avoid Deep Discharges: Do not let the battery drain to 0% if you can avoid it. Running lithium-ion batteries completely dead frequently will significantly shorten their overall lifespan. If your vacuum gets stuck under a couch and dies, find it and return it to the base as soon as possible.
- Temperature Control: Heat is the enemy of battery chemistry. Ensure your charging station is placed in a cool, dry area away from direct sunlight, heating vents, or radiators. Overheating during charging can permanently damage the cells.
- Regular Usage: These batteries are meant to be used. Running your vacuum at least twice a week keeps the electrons flowing and maintains the health of the chemical cells better than leaving it completely idle for weeks on end.
Troubleshooting Vacuum Charging Station Issues
Have you ever found your robot vacuum dead, just inches away from the dock, or sitting on the dock but refusing to charge? Troubleshooting vacuum charging station issues usually comes down to three common culprits: dirty contacts, poor placement, or power supply faults.
- Cleaning the Charging Contacts: This is the #1 reason for charging failure. There are metal plates on the bottom of the robot and corresponding metal pins on the base station. Dust, floor wax, and oils naturally coat these contacts, creating a barrier that prevents the transfer of electricity. Take a melamine sponge (like a Magic Eraser) or a cloth lightly dampened with rubbing alcohol and vigorously rub both the contacts on the robot and the pins on the dock until they are shiny.
- Evaluating Dock Placement: Your robot needs a clear runway to dock successfully. Most manufacturers recommend at least 1.5 feet of clearance on either side of the dock and 4 feet of open space in front. If the dock is hidden under a tight piece of furniture or placed on a thick carpet, the robot may approach at an angle and fail to align with the pins. Ensure the dock sits flat against a wall on a hard surface.
- Check the Power Brick: Ensure the power cable is firmly plugged into the wall and the back of the dock. Sometimes, playful pets or the vacuum itself can knock the plug loose.
Navigating the Mopping Features
Many of today’s premium Robot Vacuums are hybrids, functioning as both vacuums and mops. Adding water to the mix requires an entirely different set of maintenance rules to prevent mold, odors, and clogged water lines.
Disposable vs Washable Robot Mop Pads
When maintaining a mopping robot, you will face the choice of using disposable vs washable robot mop pads. Each has its pros, cons, and maintenance requirements.
- Washable Microfiber Pads: These are the standard pads included with most devices. They are cost-effective and environmentally friendly. However, they require immediate attention after a cleaning run. Leaving a damp, dirty mop pad attached to the bottom of the robot will damage your flooring (especially wood) and lead to severe mildew odors within 24 hours. After a mopping cycle, remove the pad, wash it in the washing machine (avoid fabric softeners, as they ruin the microfiber’s absorbency), and let it air dry completely.
- Disposable Pads: These offer ultimate convenience. You simply attach them, let the robot clean, and throw them away. They are excellent for cleaning up specific, gross messes (like pet accidents or muddy footprints) where you wouldn’t want to run the grime through your washing machine. While they reduce maintenance time, they represent an ongoing recurring cost.
Water Tank Maintenance: Never leave stagnant water in the robot’s reservoir. Empty the tank after every mopping session. To prevent mineral buildup which can clog the internal water pumps, use distilled or filtered water instead of hard tap water. Unless your manufacturer explicitly sells a proprietary cleaning solution, do not put floor cleaner, bleach, or vinegar into the water tank. These chemicals can degrade the plastic tank, destroy the rubber gaskets, and void your warranty.
Navigating Replacement Parts
Eventually, parts break or wear down beyond the point of cleaning. When it comes time to buy new filters, brushes, and batteries, consumers are faced with an overwhelming number of options.
Genuine vs Third Party Replacement Parts
If you browse online marketplaces like Amazon, you will see “compatible” replacement kits selling for a fraction of the price of the official manufacturer parts. Understanding the genuine vs third party replacement parts debate is crucial for the longevity of your machine.
Genuine (OEM) Parts:
- Pros: Guaranteed to fit perfectly. Made from the correct materials. Ensures your device operates at peak efficiency. Does not void your warranty.
- Cons: Significantly more expensive.
Third-Party (Aftermarket) Parts:
- Pros: Highly affordable. Often sold in massive bulk bundles.
- Cons: Quality is a gamble. Filters might not be true HEPA, allowing dust to enter the motor. Brushes might have bristles that are too stiff (scratching floors) or too soft (failing to pick up dirt). Batteries might lack proper thermal regulation.
The Verdict: For items that directly impact the internal motor or the safety of the device, stick to genuine parts. This includes the HEPA filters and the lithium-ion battery. A cheap, poorly sealed third-party filter will let fine dust bypass the collection bin and coat the suction motor, eventually causing the vacuum to overheat and die.
For items that are purely mechanical and external, such as edge-sweeping side brushes or mop pads, highly-rated third-party alternatives are usually fine and can save you a considerable amount of money over the lifespan of the vacuum.
Software, Mapping, and Digital Maintenance
Robot vacuums maintenance isn’t just physical; it is also digital. The software that drives your home automation device needs occasional upkeep to prevent erratic behavior.
Resetting Robot Vacuum Software and Mapping
As your vacuum cleans, it constantly updates its internal map. Sometimes, moving furniture around, leaving a door open, or mirrors reflecting the LiDAR lasers can cause the map to become distorted or “corrupted.” You might notice your robot trying to drive through solid walls on the app or getting lost in the middle of a hallway.
When digital confusion occurs, resetting robot vacuum software and mapping is the best solution.
- Map Restoration: Check your vacuum’s companion app. Many apps (like the iRobot Home app or Roborock app) allow you to load a previous “good” version of your home map. This is a quick fix that doesn’t require a total wipe.
- Re-mapping: If the map is completely compromised, delete the current map entirely. Tidy up your house, open all the doors to the rooms you want cleaned, turn on the lights, and send the robot out on a fresh mapping run.
- Firmware Updates: Ensure your app is set to automatically update the robot’s firmware. Manufacturers frequently release patches that improve navigation algorithms, battery management, and obstacle avoidance capabilities.
- Hard Factory Reset: If the robot is entirely unresponsive or failing to connect to your Wi-Fi despite router restarts, you may need to perform a hard reset. This usually involves holding down a combination of the ‘Home’ and ‘Clean’ buttons on the vacuum itself for 10-15 seconds. Consult your user manual for the exact sequence. A factory reset clears all schedules, Wi-Fi data, and maps, returning the robot to its out-of-the-box state.
Troubleshooting Common Issues
Even with meticulous maintenance, occasional hiccups happen. Here is how to diagnose and fix some common problems.
Why is My Robot Vacuum Making Loud Noises?
A healthy robot vacuum produces a steady, smooth whirring sound. If the acoustic profile of your machine suddenly changes, it is a cry for help. If you are asking yourself, “why is my robot vacuum making loud noises?”, listen closely to the type of sound to diagnose the issue:
- Loud Rattling or Grinding: This almost always indicates that something solid (a coin, a small toy, a piece of hard plastic) has been sucked up and is violently bouncing around inside the dustbin or is trapped in the brush roll housing. Turn off the vacuum immediately and inspect the brush cavity and bin.
- High-Pitched Whistling or Squealing: This is usually an airflow issue. The filter is likely entirely blocked, or something is obstructing the intake port. The motor is struggling to pull air through, creating a high-pitched whine. Replace or deep clean the HEPA filter.
- Clicking or Ticking Sound: A rhythmic ticking that speeds up as the robot moves is often caused by debris stuck in the wheel treads or a tangled caster wheel. It can also occur if the side brush is bent and slapping against the wheel or the chassis.
- Grinding Sound When Moving: If the brushes are clear, but the robot sounds like a coffee grinder as it drives, the internal gears of the drive wheels or the main brush motor may be stripped or heavily contaminated with grit. This usually requires replacing the specific wheel module or brush motor—a repair that is surprisingly easy on highly modular brands like Roomba.
The Vacuum Stops and Beeps But Has No Error Message
Sometimes a vacuum will stop in the middle of a room for no apparent reason. If the app doesn’t provide a clear error message, it is usually a sensory issue. Wipe down all the cliff sensors and the front bumper sensors. Additionally, check the front bumper to ensure it moves freely. If the bumper is jammed by dust or a small crumb, the vacuum thinks it is permanently pressed against a wall and will refuse to move forward. Gently tap the bumper to dislodge any trapped debris.
Long-Term Storage Solutions
There may come a time when you need to put your device away for an extended period—perhaps you are moving, taking a long vacation, or transitioning to a different home automation setup.
Long-term storage tips for automatic vacuums revolve primarily around preserving battery health and preventing mold.
- Prep the Battery: Never store a robot vacuum with a dead battery, and conversely, it is not ideal to store it at exactly 100%. For long-term storage (more than a month), charge the vacuum to about 50%. This is the optimal chemical state for lithium-ion cells to rest.
- Power it Down Completely: Do not just take it off the dock and put it in a closet. The vacuum will remain in standby mode, searching for Wi-Fi and the base station, which will drain the battery to 0% within a few days. Press and hold the power button to shut the system down completely. If your model has a physical toggle switch (common on older models), flip it to the “off” position.
- Clean and Dry Everything: Empty and wash the dustbin. Ensure the bin and filters are 100% bone dry. If your robot is a mop hybrid, empty the water tank entirely and let it air dry with the cap off for 24 hours before storing. Storing a vacuum with moisture inside guarantees a mold infestation.
- Storage Environment: Place the vacuum and its docking station in its original box or a sealed plastic bin to protect it from dust. Store it in a climate-controlled room. Avoid hot attics or freezing garages, as extreme temperatures will permanently ruin the battery cells.
When you are ready to use the vacuum again, place it manually on the charging dock, let it charge to 100%, and allow it to run a full cycle to recalibrate its battery management system.
Creating a Master Maintenance Schedule
To ensure you never fall behind, we recommend saving or printing the following master maintenance schedule. Staying on top of this checklist will guarantee exceptional performance and a long lifespan for your automated helper.
After Every Use (or Daily):
- Empty the dustbin.
- Empty the mopping water reservoir (if applicable).
- Remove and wash the mopping pad (if applicable).
Once a Week:
- Remove the dustbin and gently tap out the filter.
- Inspect the main brush roll and use the safety blade to cut away tangled hair.
- Wipe down the cliff sensors and charging contacts with a dry microfiber cloth.
Once a Month:
- Wash the plastic dustbin with warm water (allow 24 hours to dry).
- Remove the edge-sweeping side brush, clear tangled hair, and wipe the chassis underneath.
- Pop out the front caster wheel, clear hair from the axle, and wipe the wheel housing.
- Wipe down the exterior of the robot, the bumper, and the camera/LiDAR sensors.
Every 2-3 Months:
- Replace the HEPA filter (do not delay this if you suffer from allergies or have pets).
- Check the condition of the side brush and main brush; replace if the bristles are missing, heavily worn, or permanently deformed.
- If using washable mop pads, assess their condition. Microfiber loses its effectiveness after too many washes. Replace if they look threadbare.
Once a Year:
- Replace the main brush roll to maintain optimal agitation.
- Replace the side spinning brush.
- Deep clean the docking station, ensuring no dust is clogging the power ports.
Conclusion
Integrating home automation into your life is a fantastic way to reclaim your time, but it is a partnership. Your robot handles the floor cleaning, but you must handle the robot vacuums maintenance.
By taking just five minutes a week to untangle brushes, wipe down sensors, and empty the bins, you are not only optimizing suction power through regular cleaning, but you are also protecting your investment. Treat your robot vacuum with care, keep those filters fresh, and respect the battery’s chemistry. If you follow these guidelines, your automated companion will happily keep your floors pristine, day in and day out, for years to come.